Its a different game
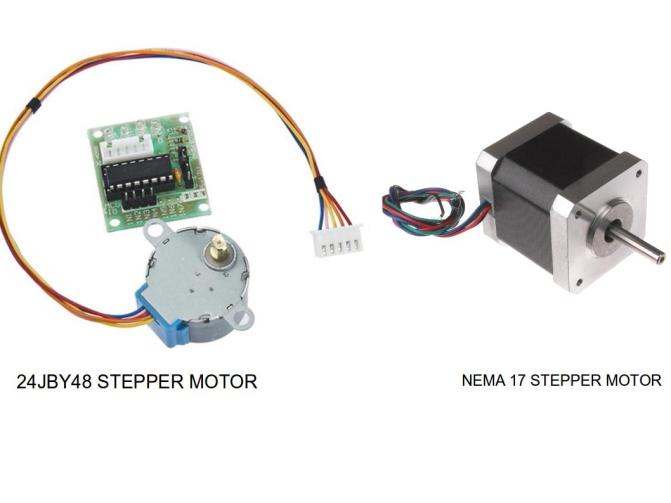
At the starting of the project I was thinking that it will be fairly straight forward to hook a NEMA 17 stepper motor to Arduino/Raspberry Pi. After all, I have an experience of connecting a 24byj48 stepper motor to both Raspberry pi and an Arduino, without any fuss. The beauty of this 24byj48 stepper motor is that it comes with its own driver board, all including just for $3 (thanks to China). That gave me confidence, that even if I burn it, I don’t mind.
But..
now I have a NEMA 17 motor, which is mostly used in 3D printers and CNC machines. It costs around $40 (when we buy from a well known vendor, not from ebay). Now the problem is choosing a correct driver board, as this motor does not come with its own driver. Moreover, Arduino/Raspberry Pi cannot directly supply the enough juice to run these motors.
Choosing a correct driver board
After stumbling upon few options, I found that Poulou’s A4988 driver is most appropriate (thanks to Google). I know people running NEMA 17 with L293D chips (I used them a lot in my robotic projects to run DC motors). But I am really worried about the shiny (and costly too) new motor, and I definitely don’t wanna burn my NEMA 17. So, I finally ordered A4988 driver board.
And I fried it..
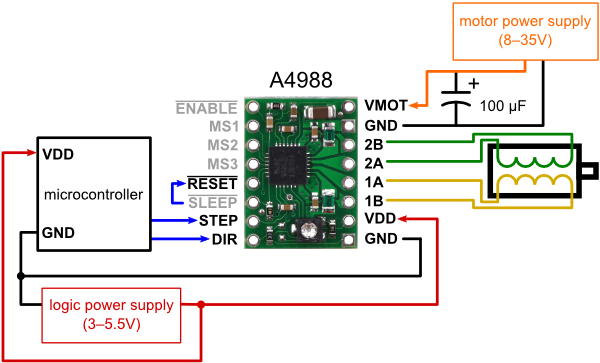
I followed an excellent connections map (and also the Arduino code given there) from this post on Arduino forums. Almost in every hacker blog/forum, this diagram is posted. I powered my board with 12V wall adaptor. I was thinking that, I was giving enough power to motors. But motor did not rotate at all. I checked my connections, rechecked…and rechecked.
First problem:
My 12V wall-adaptor does not output enough current output. I don’t know, how I failed to check this minor detail. Anyhow, I have replaced the power source with a 8 AA battery pack. And it rotated. I rejoiced and wanted permanent connections, instead of messing up everything on a bread board with lose connections.
Second problem:
When I soldered everything on a prototype board, for some odd reason, which I have no clue even now, motor did not rotate at all. I was frustrated. First sign of failure. Went back to breadboard, abandoning the prototype board. I reconnected the motor pins and exchanged connections, quite a number of times. I hate my hacker mind for tempting do this.
Because..
There is a small warning that says, we should not plug or unplug a stepper motor, when the driver board is powered. I learnt this after reading few forum posts, carefully. What happens, if you ignore the warning. Simply your driver board will be fried. And it happened to me.
How I solved it:
Simply ordered a new board, which arrived in just 2 days, thanks to a ebay UK supplier. Now with the new motor driver, I have taken at most care and connected every according to the above circuit diagram. My motor is finally running.
But..
still there is a small problem. Motor is vibrating while rotating. It is no where near to smooth running. Googled again patiently. The solution suggested was that interchange the connections going to the Motor. Now, I have checked spec sheet of the motor, colour code of NEMA 17 wires and read quite a few forums. Result is that, interchanging the motor pin connections simply wont work. Back to square one. I suspected that Arduino code might be a problem.
Yes it is..
I have changed now to an excellent stepper motor library written by good guys at Adafruit. I installed the AcclStepper library and it worked like a charm. Finally, my stepper motor is now running smoothly. After spending almost 4 late nights, I figured it out. I am ashamed to waste so much time on such a simple task. But that is how a newbie scientist learns.
Lessons learned:
- Never, plug and unplug a motor connections, when the driver board is powered.
- Don’t blindly use a high voltage power source, without looking at its current supply capacity.
- Better use 8 AA battery pack, rather than a fancy 9V battery.
-
If you burned a driver board already, that’s alright. Don’t waste figuring out the connections. Just order a new board. That will save lots of time and save your sanity and few hairs on your head.
-
Once after figuring out that your motor is working, better use a AcclStepper library, than the raw Arduino code. It would make your motor and your life easy and smooth.
Codes:
Simple Arduino code to test the running of the stepper motor
//simple A4988 connection
//jumper reset and sleep together
//connect  VDD to Arduino 3.3v or 5v
//connect  GND to Arduino GND (GND near VDD)
//connect  1A and 1B to stepper coil 1
//connect 2A and 2B to stepper coil 2
//connect VMOT to power source (9v battery + term)
//connect GRD to power source (9v battery - term)


int stp = 13;  //connect pin 13 to step
int dir = 12;  // connect pin 12 to dir
int a = 0;     //  gen counter

void setup()
{
  pinMode(stp, OUTPUT);
  pinMode(dir, OUTPUT);
}


void loop()
{
  if (a <  200)  //sweep 200 step in dir 1
   {
    a++;
    digitalWrite(stp, HIGH);
    delay(10);
    digitalWrite(stp, LOW);
    delay(10);
   }
  else
   {
    digitalWrite(dir, HIGH);
    a++;
    digitalWrite(stp, HIGH);
    delay(10);
    digitalWrite(stp, LOW);
    delay(10);

    if (a>400)    //sweep 200 in dir 2
     {
      a = 0;
      digitalWrite(dir, LOW);
     }
    }
}
Now to get smooth rotation of the motor, I have used the following code, which makes use of AcclStepper library.
#include <AccelStepper.h>AccelStepper Stepper1(1,13,12); //use pin 12 and 13 for dir and step, 1 is the "external driver" mode (A4988) int dir = 1; //used to switch direction void setup() { Stepper1.setMaxSpeed(3000); //set max speed the motor will turn (steps/second) Stepper1.setAcceleration(13000); //set acceleration (steps/second^2) } void loop() { if(Stepper1.distanceToGo()==0){ //check if motor has already finished his last move Stepper1.move(1600*dir); //set next movement to 1600 steps (if dir is -1 it will move -1600 -> opposite direction) dir = dir*(-1); //negate dir to make the next movement go in opposite direction delay(1000); //wait 1 second } Stepper1.run(); //run the stepper. this has to be done over and over again to continously move the stepper }
Credits
http://electronics.stackexchange.com/questions/95238/stepper-motor-rotating-but-vibrating
http://www.linengineering.com/resources/wiring_connections.aspx
Click to access QSH4218_manual.pdf
http://www.robotdigg.com/news/26/Reprap-Stepper-Motor
http://semiengineering.weebly.com/blog/stepper-driven-by-arduino-a4988
